Showing posts with label kids. Show all posts

Tuesday, November 4, 2014

Party Favor - Angry Birds Goody Bags


I wanted to make cute fabric goody bags for my son's birthday party but was shocked to discover that Angry Birds fabric is hard to come by.  So, I improvised.

The design is pretty simple and is based on a picture i found for Angry Birds Space.


The process was pretty simple.  Here's what i did.

Total cost for a dozen goody bags was $8.  I bought 1 yard of plain red fabric (on sale), several pieces of felt, red ribbon.  I also used a glue gun.


I ended up not using the thread and opted instead to use a glue gun.  It was MUCH faster than sewing!
If your artistic, you can probably free hand draw the pattern.  If you're not so artistic, here's how you make a pattern.

So that i would have perfect circles, I used a bowl and a shot glass.
I used a bowl and a shot glass to draw the circles.  I made the triangles and the diamond without any help.


Next, cut out the shapes.

The large circle will be used for the eyes and the body.  Cut the large circle in half.


Next make the background for the eyes.


Fold a half circle in half and mark point.


Now for the body.  Take the other (uncut) half circle and fold it in half. 


Mark and cut this circle as pictured. 


This is what your circles should look like.

Now find the small circle.  Mark and cut as pictured.


This will be the white of the eye.


For the top of the beak, mark and cut the diamond as pictured.


Now your pattern is all ready.


If you are making 1 goody bag,

Cut:
1 - black eye piece
1- brown body piece
2- white eye pieces
1- gold lower beak (large triangle)
1- purple tongue (small triangle)
1 - gold upper beak (diamond)

Cut 1 square of red fabric for the goody bag.

Next, lay everything out to make sure that it looks good to you.


Adjust everything so that it's sitting just right then sew or hot glue it all in place.

In terms of placement , i centered the face on the center front of the bag.  I sewed the ribbon tie just above the eyes.


Next, fold the angry bird face in half and sew the back seam.


sew the back seam
Next, adjust the bag so that the face will be flat.  Sew the bottom seem.

sew the bottom seam
Turn the bag, inside out.  Finish the top edge.


Now fill with goodies!!!!


This post is courtesy of Kathy W.

Party Favors - Mario Brothers Hats

 A few years back my kids were obsessed with Angry Birds.  I'm mean OBSESSED!  I thought they'd never be over it.  But alas, time moves on and so do kid obsessions.  It's nearly birthday time again at our house and all my son wanted for his party were Mario and Luigi hats!

Easy Mario Brothers Hats
 A few years ago I made Angry Birds Loot bags for a birthday party.  That experience taught me that you can make just about any cartoon character if you break it down into basic shapes.  Here's the link for the Angry Birds Loot Bags.

Easy Angry Birds Loot Bags


In this tutorial I'll show you how to make the easiest Mario Brothers hats around.  Since I'm a visual person I took LOTS of pictures.  Probably too many - but you'll see.  This project is wicked easy!

For this project you will need:
Makes 10 hats

1/2 yard green fleece
1/2 yard red fleece
white fleece or felt (scrap pieces work fine)
thread
Red thread
Green thread
White thread
1 dinner plate
1 bowl
marker (I used a sharpie)
Scissors
sewing machine

What to do:

Gather all of your materials.  This won't take long at all!
I chose a 10.5" dinner plate (mostly because that's what I had on hand) and a bowl that was approximately 1/2 the size of the plate.

Plate and bowl for tracing
10" plate
5.5" bowl


 Here is a picture of the final hat.

Finished hat on my 6 year old
 If you need a larger/floppier hat choose a larger plate and bowl).

 Fold the fabric in 1/2 and trace around the plate.  Center the bowl inside the plate circle and trace around the bowl.

Trace the plate and bowl using a marker

 Cut out the larger circle.  (because the fabric was folded you'll end up with 2 large circles)

Cut out the large circle
 Next carefully cut out the smaller circle.  You will end up with 3 circles like this.

Cut the smaller circle
  Fold the smallest circle in 1/2 and cut on the fold.

Fold the smallest circle in 1/2 and cut on the fold

Hat pieces

Now for the monogram.

Use scrap fleece or felt
The circle should be small enough to fit inside the hat band


Cut the white fabric into a circle that is small enough to fit on the hat band.

Using fabric scraps, cut a small red square


Cut a red square small enough to fit inside the white circle.

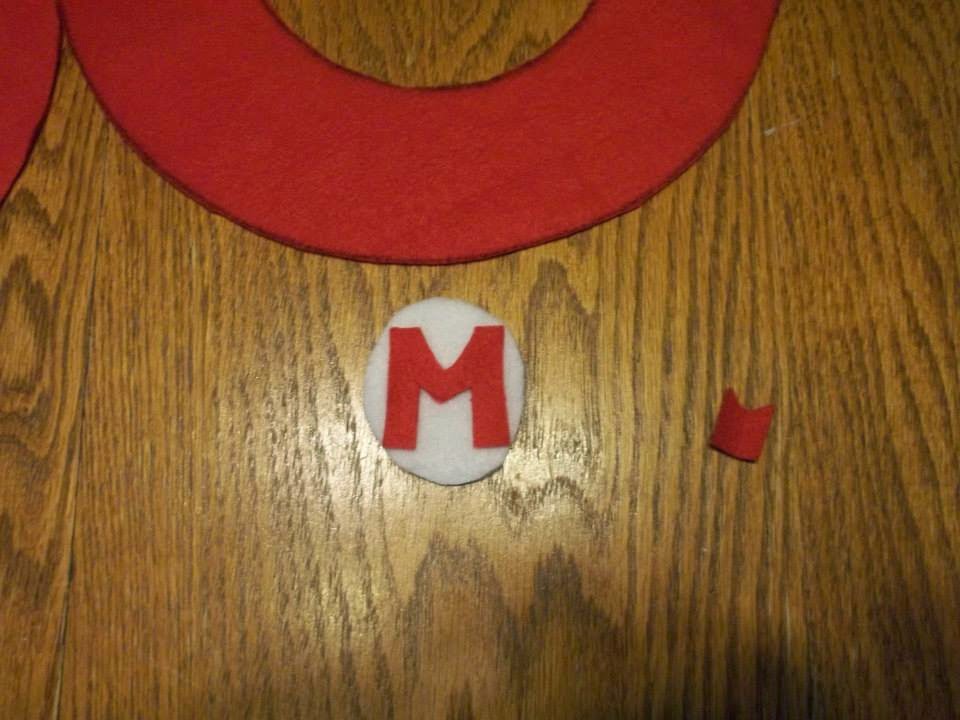
Cut the small red square into the letter "M".

Fold the square in half
Cut a notch on top of the fold
Cut the bottom like this
Look, you made an "M"
Make sure it fits!
 Make sure that you're "M" fits inside the white circle.  Trim as necessary.

Now you're ready to sew!

Using red thread, sew the "M" to the white circle.

Stitch the M in place


Set the letter aside.  It's time to sew the hat!

Sew the outer edges of the hat
Sew the outer edge of the 2 larger circles together.

Turn it inside out

Turn the hat inside out.

Sew the hat bill
Stitch the egde just like this!

Sew the rounded edges of the smaller circle together.  Turn it inside out.  At this point your project should look like this.

Almost done!

Center the initial on the hat band.  Using white thread, sew it in place.

Center the letter


Sew it in place


Time to sew the hat's bill.  Center the bill over the letter.  Stitch the hat bill in place.

Center the bill over the letter
Sew the bill in place
That's it!  You're done!

TA-DA!  All done!


Wasn't that so easy!!!!


Now if you're me, you do this again 9 more times to please your kid!

Mario Hat Bonaza!
I sewed and sewed just dreaming of the glimmer in my son's eye!

But wait...what's that you say son!?  Oh, you've changed your mind you say?  Now that I'm all done sewing you don't want Mario and Luigi hats!?   To quote my mother "dirty words and nasty thoughts!" Turns out the young master is worried that his friends aren't as into Mario and Luigi as he.  Turns out he's afraid he'll get teased if I bring "baby dress up clothes" to his school party.

!#@$&!!
The good news is that mommy is as crafty a business woman as she is a hat maker.  And so I posted the hats on etsy!

Another mom needed 16 hats.  So I whipped up a few more and shipped them off to Brooklyn!

Etsy saves the day!


Let's just hope that her son is sweet and grateful!

I still don't have a give-away for my son's party, but I'm thinking he might not deserve one.  I'll keep you posted!

Happy Creating!

2 Mario's
This post courtesy of Mocha Kathy W.