Showing posts with label sewing. Show all posts

Tuesday, February 17, 2015

Reduce/Reuse/Recycle: Pajama Pants from Bed Sheets!

Pajama Pants from Sheets
A couple of years ago making pajama pants from a pillowcase was all the rage on Pinterest.  I LOVED the idea and used several old pillowcases to make pants for my son.

He's taller now and a pillow case won't work.  I've updated that old idea and now I'm making him pj's from sheets!

The beauty of this project is that you can start with almost any sheet.  I'll post tips for choosing the best sheet at the end of this blog entry.

Standard Twin Size  Flat Sheet


This sewing project is fast and easy.  Experienced sewers can complete this project in less than 30 minutes.

For this project you will need:

1 Twin Size Flat Sheet (Makes 2-4 pairs of pants depending on size)
Thread
3/4" elastic
1 large safety pin
scissors
1 pair of pants (this will be your pattern)
A large flat work surface would be great.  You could use the floor
Marker (optional)
Pins (options)

FIND PANTS FOR A PATTERN

First identify a pair of pants that currently fit well.  My son is a size 10 slim.  I used a pair of his jeans.

Sewing Tip: Use pants that currently fit and are comfortable.

Jeans to use a a pattern

Fold the sheet in half.  Now fold the pants in half with the legs together.

Fold the pants in half with the legs together

Lay the folded pants on the folded sheet.

CUTTING OUT THE PANTS:

Lay the pants on the folded sheet.
Leave space around all sides of the pants
Make sure there is space around all sides on the pants.  You don't want the pants on the edge of the sheet.

IMPORTANT TIP:  The top of the pants should be square.  In the picture below, the pants go in at the waist.  Cut the fabric square as pictured.

Cut square at the waist.
Trace around the pants leaving at least 1" around all sides.  OR, cut around the pants leaving at least 1" around all sides.  (I didn't trace, I just cut).  If you're a beginning, trace an outline of the pants, then cut the fabric.

IMPORTANT TIP:  If you plan to hem the pants leave 2-3" at the bottom for hemming.

Cut extra length if you want to hem the pants

Cut 4 pant pieces that look like this.

You'll need 4 pieces that look like this.

SEWING THE PANTS

Take the first 2 pant pieces and sew the long sides together (as pictured).    Then sew the short sides together.

Sew the long sides together.
Then sew the short sides together.
Repeat this step on the 2 remaining pant pieces.

Now turn the pants right side out.  The completed pieces should look like this.

2 sewn pant legs

Sewing tip:  I only have sons and they DESTROY all things!  To make sure that my seams are extra strong I double or triple sew all seams in their clothes.  This is an optional step, but it may well save sewing repairs later.  

I sew each seam twice and then do a zigzag stitch on the edge.  

Triple Sewn Seam


Now it's time to sew the crotch seam.

With the right sides out, pin and sew the 2 legs together.  Make sure to match up the inseams.  Even if you don't double or triple sew all of seams, the inseam (crotch seam) should ALWAYS be double sewn.


Double sew the crotch seam

CREATING THE WAISTBAND


To reduce fraying, zigzag stitch the top edge of the waistband.

Turn the pants inside out and fold down the waist band.  Make sure the fold is large enough to accommodate the elastic.


Fold pants to create a waist band
I like a top and bottom seam on a waistband.  That is a matter of personal preference.  Make sure to leave an opening to install the elastic.

Leave an opening for the elastic.
Measure elastic around the child's waist.  Clip a large safety pin to 1 end of the elastic and thread it through.

Thread the elastic through

After you thread the elastic through the waistband sew the ends of the elastic together.
Stitch the elastic together.
Sew the opening closed.

HEMMING THE PANTS

I have a dirty little secret.  I don't really hem pajamas unless I really have to.  Instead I just do a zigzag stitch around the bottom edges of the pants.  Depending on the fabric I might zigzag over the edge 2-3 times.

Double zigzag edge instead of a hem

THAT'S IT!  You're all done!

Brand New Pants!!!!
My son LOVES these pants!

He's a long lean kid.  1 Twin size flat sheet makes 3 pairs of pants!!!

PRO TIPS:
How to choose the right sheets

*  If you're using an old sheet, make sure that it's not too worn.  Flat sheets tend not to get too worn out.  Fitted sheets are usually worn in the middle.

*  If you're buying a new sheet try and feel the fabric before you buy.  The silkier the fabric the better.  My son likes brushed cotton.

*  Don't use thin sheets.  Thin sheets are cheaper to buy but they rip and/or get worn out quickly.  It's worth it to spend a little more if you're buying new.

Click HERE for more Sewing Tutorials from Kathy.

This post is courtesy of Mocha Kathy W.

Click HERE for more Crafty ideas from the Mocha Moms.

Tuesday, November 4, 2014

Party Favors - Mario Brothers Hats

 A few years back my kids were obsessed with Angry Birds.  I'm mean OBSESSED!  I thought they'd never be over it.  But alas, time moves on and so do kid obsessions.  It's nearly birthday time again at our house and all my son wanted for his party were Mario and Luigi hats!

Easy Mario Brothers Hats
 A few years ago I made Angry Birds Loot bags for a birthday party.  That experience taught me that you can make just about any cartoon character if you break it down into basic shapes.  Here's the link for the Angry Birds Loot Bags.

Easy Angry Birds Loot Bags


In this tutorial I'll show you how to make the easiest Mario Brothers hats around.  Since I'm a visual person I took LOTS of pictures.  Probably too many - but you'll see.  This project is wicked easy!

For this project you will need:
Makes 10 hats

1/2 yard green fleece
1/2 yard red fleece
white fleece or felt (scrap pieces work fine)
thread
Red thread
Green thread
White thread
1 dinner plate
1 bowl
marker (I used a sharpie)
Scissors
sewing machine

What to do:

Gather all of your materials.  This won't take long at all!
I chose a 10.5" dinner plate (mostly because that's what I had on hand) and a bowl that was approximately 1/2 the size of the plate.

Plate and bowl for tracing
10" plate
5.5" bowl


 Here is a picture of the final hat.

Finished hat on my 6 year old
 If you need a larger/floppier hat choose a larger plate and bowl).

 Fold the fabric in 1/2 and trace around the plate.  Center the bowl inside the plate circle and trace around the bowl.

Trace the plate and bowl using a marker

 Cut out the larger circle.  (because the fabric was folded you'll end up with 2 large circles)

Cut out the large circle
 Next carefully cut out the smaller circle.  You will end up with 3 circles like this.

Cut the smaller circle
  Fold the smallest circle in 1/2 and cut on the fold.

Fold the smallest circle in 1/2 and cut on the fold

Hat pieces

Now for the monogram.

Use scrap fleece or felt
The circle should be small enough to fit inside the hat band


Cut the white fabric into a circle that is small enough to fit on the hat band.

Using fabric scraps, cut a small red square


Cut a red square small enough to fit inside the white circle.

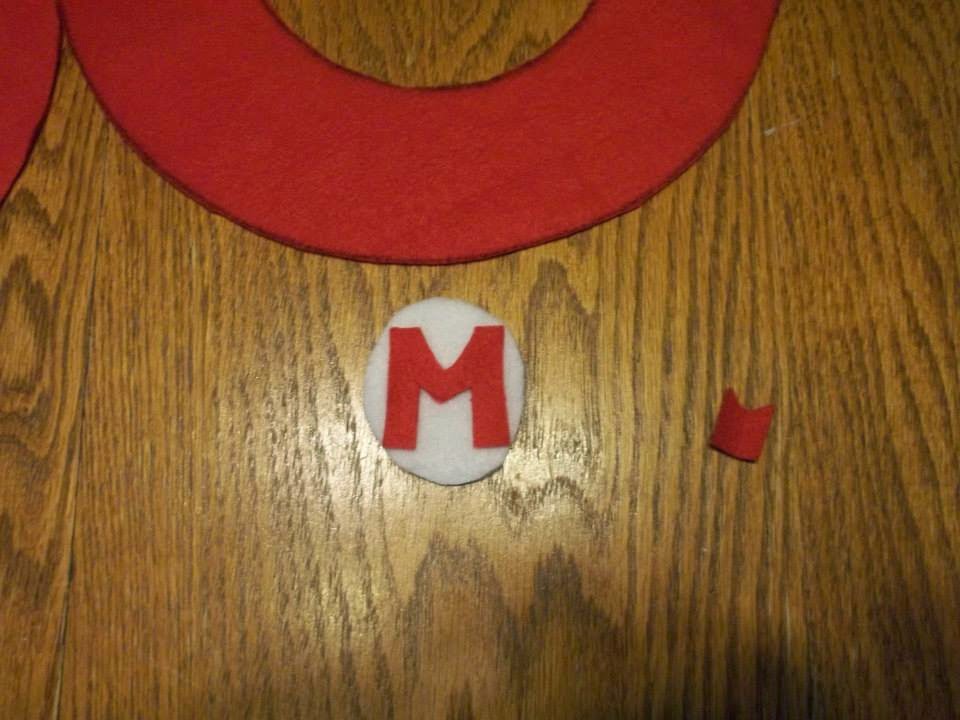
Cut the small red square into the letter "M".

Fold the square in half
Cut a notch on top of the fold
Cut the bottom like this
Look, you made an "M"
Make sure it fits!
 Make sure that you're "M" fits inside the white circle.  Trim as necessary.

Now you're ready to sew!

Using red thread, sew the "M" to the white circle.

Stitch the M in place


Set the letter aside.  It's time to sew the hat!

Sew the outer edges of the hat
Sew the outer edge of the 2 larger circles together.

Turn it inside out

Turn the hat inside out.

Sew the hat bill
Stitch the egde just like this!

Sew the rounded edges of the smaller circle together.  Turn it inside out.  At this point your project should look like this.

Almost done!

Center the initial on the hat band.  Using white thread, sew it in place.

Center the letter


Sew it in place


Time to sew the hat's bill.  Center the bill over the letter.  Stitch the hat bill in place.

Center the bill over the letter
Sew the bill in place
That's it!  You're done!

TA-DA!  All done!


Wasn't that so easy!!!!


Now if you're me, you do this again 9 more times to please your kid!

Mario Hat Bonaza!
I sewed and sewed just dreaming of the glimmer in my son's eye!

But wait...what's that you say son!?  Oh, you've changed your mind you say?  Now that I'm all done sewing you don't want Mario and Luigi hats!?   To quote my mother "dirty words and nasty thoughts!" Turns out the young master is worried that his friends aren't as into Mario and Luigi as he.  Turns out he's afraid he'll get teased if I bring "baby dress up clothes" to his school party.

!#@$&!!
The good news is that mommy is as crafty a business woman as she is a hat maker.  And so I posted the hats on etsy!

Another mom needed 16 hats.  So I whipped up a few more and shipped them off to Brooklyn!

Etsy saves the day!


Let's just hope that her son is sweet and grateful!

I still don't have a give-away for my son's party, but I'm thinking he might not deserve one.  I'll keep you posted!

Happy Creating!

2 Mario's
This post courtesy of Mocha Kathy W.