Showing posts with label easy. Show all posts

Monday, December 15, 2014

Moist Chocolate Mug Cake (Vegan)

This post needs to start with a complete disclosure.  This is not my recipe.  I found this chocolately delight late one night when searching the inter webs for an easy late night snack.


Much love and credit to Julie at Table for Two.  She originally developed this recipe!

Moist Chocolate Mug Cake
makes 1
  • ¼ cup all-purpose flour
  • 2 tbsp. unsweetened cocoa powder
  • ¼ tsp. baking powder
  • 2 tbsp. granulated sugar (you can add 1 tbsp. more if you like it a bit sweeter)
  • ⅛ tsp. salt
  • ¼ cup + 1 tbsp. milk (soy milk or almond milk is fine)
  • 2 tbsp. neutral flavored oil (I like canola but you could also use canola)
  • Optional - 1 tbsp. hazelnut chocolate spread OR chocolate chips (not both - use one or the other)
Instructions:
  1. In a medium bowl, whisk together dry ingredients.
  2. Whisk in the milk and oil until all ingredients are combined and batter has no clumps.
  3. Spray 1 mug with cooking spray. (I use Pam Baking spray but some people skip this step entirely)
  4. Pour batter into a microwave-safe mug. Mine was a 14-ounce mug. You want enough head space for the cake to rise without pouring over.
  5. Microwave mug cake for 70 seconds on high (PLEASE READ NOTES CAREFULLY BELOW)
  6. Leave the microwave door closed and allow the cake to rest for 60 seconds.
  7. Carefully remove from microwave and enjoy!

Top with ice cream, whipped cream or just eat it plain!
Notes:
Please note that ALL microwaves are different therefore can yield different results and can overcook this mug cake if you aren't careful. My microwave is 950 watts and I cooked mine on 100% power for 70 seconds. Knowing this information, it may help you better judge how long to cook yours for and at what power.
**This recipe is specifically made for the microwave.


More Mug Cakes

This post is courtesy of Mocha Kathy.

Thursday, November 13, 2014

NO SEW - Seat Back Phone/Tablet Mount


Smart Commuter

This post if for my bus commuter friends.  I know that some of you have seen people on the commuter bus with their phone or tablet attached to the seat back in front of them.  (Pictured above).  In my opinion this is an AWESOME way to travel!

The problem is that I don't want to attach Velcro directly to my phone (or tablet) because I only need it for like 2 hours a day.

My solution is this clear vinyl sleeve.

Clear Sleeve
It's so simple that I feel like an idiot for not thinking of this sooner!

For this project you will need:

12-gauge clear vinyl
sticky back Velcro
Scissors

12 gauge Vinyl

Stick back Velcro


Because I'm working with clear vinyl it's difficult to photograph the step by step.

Step #1 - wrap the vinyl around the phone 1 time so that it covers the phone completely with about an inch of overlap.  Cut the vinyl.
Wrap vinyl around the phone 1 time.  Cut to size

Step #2 - add Velcro for closure

Add Velcro closure


Step #3 - Add Velcro to the back of the phone so that it can stick to the bus seat.

Add Velcro to the back of the sleeve
That's it!

All Done!
This is seriously the EASIEST project in the world!

Now when you're ready for your commute, wrap the phone/tablet in the sleeve and stick it on your seat back!


PRO TIP:
There are a couple of important tips to remember.  
#1 - TEST YOUR BUS SEAT!  Depending on the fabric used on commuter buses in your area, Velcro may not work.  New Jersey Transit buses are made of a rough(ish) fabric that allows Velcro to stick perfectly!  If your seat back is soft, Velcro may not work.  TEST FIRST!
test your seat back!
#2 - This will NOT work on most car seats!  I'm working on a solution for cars!
#3 - If you've using a larger phone or tablet get extra sticky Velcro!  I'm using an iPhone 5 and regular Velcro holds the weight of the phone just fine.


SUPER PRO TIP:
If you sew, you can add a layer of oil cloth or other fabrics to make this sleeve in various colors.

Oil Cloth Sleeve w/ Velcro

Black Vinyl Sleeve with snaps 
Add a layer of colored vinyl or oil cloth over the clear vinyl to make a more colorful case.  Be sure to measure and cut a window carefully.  Stitch the colored cloth to the clear vinyl.  You'll need to stitch around the window and all the way around the edges to hold the colored cloth in place.

I LOVE oil cloth because it comes in so many colors!

Oil Cloth

FINAL NOTE:  You WILL be able to use your touch screen through the clear vinyl!

Monday, November 10, 2014

Pumpkin Pie from Fresh Pumpkin

Yes, it's just about that time of year again.  Batten down the hatches moms, it's time for the annual school trip to the pumpkin patch!

Don't worry dads!  This trip could be fun (theoretically).  :)  

Usually I give pro tips at the end of a post.  In this case i'll give it at the beginning.  If you have to, need to or want to go on the school field trip to the pumpkin patch here's the best tip of all :  DRIVE YOUR OWN CAR!  You can listen to the music you like, make phone calls or simply enjoy some much needed peace and quiet!

Tip #2 - Get the kids to pick small pumpkins!  They're cute and more easily portable!


Fresh Pumpkins

Cooking your pumpkin

I’ll be honest, the main reason I want the kids to choose a small pumpkin so that I can cook it later.   Smaller pumpkins are easier to cook! 

Cook small to medium pumpkins in the crock pot!

CROCK POT Method


Remove the stem.  Place your [uncut] small/medium pumpkin in the Crockpot with about ½ cup water.  With the lid in place, set the pot to high and cook for 3 hours (cook for 6 hours on low).  Once the pumpkin is fork tender it’s ready.

Removing the pumpkin can be tricky.  I usually stab it with 2 forks and pull it out.

Use 2 forks to lift pumpkin fro Crock Pot


OVEN Method

If the pumpkin is small/medium, rub it with oil and place it/them [uncut] in the oven.  Bake at 350 degrees until soft.

If the pumpkin is large you may need to cut it in half.  When it’s fork tender, it’s ready.


Once it cooked:

Cut the pumpkin in half and remove the seeds and strings from the center.  Scoop out the flesh and mash with a potato masher.

Pumpkin flesh can be lumpy or stringy.  For making soup, pie or baby food run the pumpkin flesh through the food processor or blender to make it smooth.  

Cut cooked pumpkin in half
Scoop out seeds and strings
This is all that's left of the pumpkin once the flesh is removed!
Mash your pumpkin


Fresh Pumpkin Pie 

(adapted from Mrs. Sigg’s Fresh Pumpkin Pie recipe on allrecipes.com)
Fresh baked pie!

1 medium sugar pumpkin  
2 readymade pie crusts
2 eggs
1 cup brown sugar OR (1 cup white sugar + 3 tablespoons molasses)
1 tablespoon all purpose flour
½ teaspoon salt
2 ½ teaspoons pumpkin pie spice
1 (12 oz can) evaporated milk

Cook pumpkin (in oven or slow cooker) until soft and puree in a blender or food processor.

Combine all ingredients in a bowl.  Mix well.  Pour into 2 pie crusts. 

Bake in 350 degree oven for 1 hour or until toothpick inserted into the center of the pie comes out clean.

This recipe makes 2 pies!
I don't have time or patience for homemade crust.
  

Tips:

  • The batter will be thin.  Don’t worry, it bakes up just fine!
  • If you don’t have pumpkin pie spice, don’t panic.  You can make your own!
  • Pumpkin pie spice = (1 ¼ teaspoon ground cinnamon, ¼ teaspoon nutmeg, ¼ ground ginger, 1/8 teaspoon ground cloves)
Super Pro Tip:
Add cooked (unmashed) pumpkin flesh and all other ingredients to blender (or food processor bowl).  Blend until smooth, pour into pie crusts.

Fresh from the blender!

Tuesday, November 4, 2014

Super Moist Red Velvet Cake

As red velvet cake is so bright and festive, i'm posting is again for the holiday season! I frost it with a light airy, cream cheese frosting. DELISH!!!!

Whatever you're celebrating this time of year, May Your Days Be Merry And Bright!

Super Moist Red Velvet Cake

2 1/2 c. flour
1 teaspoon baking soda
1 teaspoon salt
1 1/2 c. sugar
1 c. buttermilk
1 teaspoon apple cidar vinegar
1 3/4 c. vegtable oil
2 eggs
1 teaspoon vanilla
1 (1oz) bottle of red food coloring

Preheat oven to 350. Mix everything thoroughly in a bowl. Pour into 2 or 3 round cake pans. Bake for approximately 35 minutes or until a toothpick inserted into the center comes out clean.

==========================

Cream cheese frosting

1 8oz pkg cream cheese
1 Tablespoon milk
1 teaspoon vanilla
4 c. powdered sugar

PRO TIP:
If you're celebrating a special occasion and want to make a different color cake it's easy!  Simply use an entire bottle of your favorite food coloring.  This could be a blue velvet or ANY color cake!   Or just leave it white!

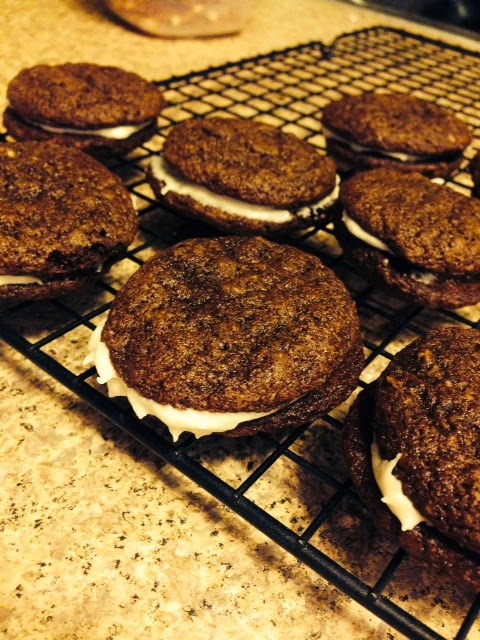
Home Made Chocolate Sandwich Cookies

I should start this post with a disclaimer.  I'm not an Oreo fan.  Never have been.  (Not even as a little kid).  I don't hate them, they're just not my thing.

Mama-made Sandwich Cookies


My kids, on the other hand, LOVE all things chocolate, all things cookie  and all things Oreo.  When my 6 year old asked for Oeros in his lunch box, I knew I needed a plan.

Have you ever read the label on a bag of Oreos!?  Yuck!

Oreo Label - Yikes!
Let's be real here:  I knew they weren't health food but fully half on the ingredients didn't seem to be real English words.  And so I came up with a compromise.  I'd make mama-Oreo's.

I LOVE to cook and bake but can't stand a recipe that's too precious.  I need a "toss the stuff in a bowl and mix" kind of recipe instead of a "sift this, gently fold that" kind of deal.  I found one and here it is:

Crispy Chocolate Cookie


The Cookie

Crispy Chocolate Cookies
3 dozen

1/2 cup melted butter  (that's 1 stick)
1/2 cup white sugar
1/2 cup brown sugar
1 small egg
1/4 cup honey (I use powdered honey)
1 teaspoon vanilla
1 3/8 cups all-purpose flour
1/2 teaspoon baking soda (heaping)
1/4 teaspoon salt
1/3 cup cocoa powder


Preheat the oven to 350 degrees.  Mix everything in a bowl.

Cookie Scoop (optional)

Cookie Balls in the Oven


I like to use a cookie scoop, but you can roll the dough into balls, or scoop it out with a spoon.  Just make sure that your dough balls are evenly sized.  Place dough balls on a cookie sheet.  Bake for 10-12 minutes.  Cool completely before frosting.

Easy right!


Now for the filling:

Vanilla Frosting

3 cups powdered sugar
1/3 cup butter or margarine, softened
1 1/2 teaspoons vanilla
1 to 2 tablespoons milk

Mix all ingredients in a bowl.  The frosting will be stiff.  Use a mixer to make the job go faster.

Once the cookies are cool, complete your sandwich cookies!

Done!

Double Stuff Version


The real test of the recipe is kids.

Cookie Judges Love THEM!
Our 2 judge panel agrees that they're GREAT!

Lunch Box Ready!


These cookies are so easy that I made them this morning to lunch time today!

PRO TIP:

These cookies freeze BEAUTIFULLY!!  To keep the kids from going into cookie overload, simply stack room temp cookies in a sandwich bag or plastic container and pop into the freezer.  Defrost at room temperature.

Freezer Ready


SUPER PRO TIP:
Both the cookie dough and frosting freeze well.  If you don't have time to bake today, make the dough and freeze in balls.  When you want just a few cookies bake as many frozen cookie balls as you need.